The Complete Step-by-Step Guide to TM SIM Registration
Have you recently purchased a new TM SIM card for your mobile phone? That is super exciting! You probably want to text your best friends, play your favorite mobile games, and watch fun videos right away. But wait, you cannot use your phone just yet. Because of a crucial new law in the Philippines, every single person must register their phone number before it will actually work. Do not worry; finding the official tm registration link is actually incredibly easy. You can do the process from your comfortable living room couch in just a few short minutes.
Many people feel a little bit scared or confused when they hear the word “registration.” They think they have to go to a busy mall, stand in a very long line, and fill out a massive stack of boring paperwork. That is totally false! Technology has made this process completely digital and super fast. You do not need to be a computer expert to get your number working today.
In this complete and easy guide, I will walk you through every single step. We will talk about why this law exists, what specific ID cards you need to prepare, and exactly how to fill out the online form safely. Grab your smartphone, take a deep breath, and let us get your brand-new TM SIM card registered right now!
Why Do You Need to Register Your TM SIM Card?
Before we start filling out any digital forms, we need to understand why we are doing this. Why did the government make this strict rule for everyone?
A few years ago, anyone could buy a cheap SIM card from a local corner store and use it anonymously. While such an arrangement was very convenient for normal people, it was a massive problem for safety. Sneaky scammers and undesirable people used these anonymous numbers to send fake text messages. They would try to steal your bank passwords or trick your grandparents into sending them money. Because the numbers were totally secret, the police could not catch the bad guys.
To fix this huge problem, the government created the SIM Registration Act. This law legally links your phone number to your real name and face.
If a bad person tries to send a scam message today, the government knows exactly who they are! Registering your card protects your digital life, keeps your family safe from annoying text scams, and helps keep the whole digital community pristine.
What Documents Do You Need Before You Start?
You cannot just click a button and be finished blindly. You need to gather a few important things before you sit down at your phone or computer. Having these things ready on your table will make the whole process super fast and totally stress-free.
Here is exactly what you need to prepare today:
1. Your Physical TM SIM Card
You need to have the actual tiny plastic card. You should insert it into your mobile phone at your earliest convenience. You need it inside the phone because the system will send you a secret text message code to prove you hold the number.
2. A Strong Internet Connection
Do not try to register while riding a bumpy jeepney with a bad cell signal. If your internet drops during the photo upload, it will cause your registration to freeze. Use a strong, stable Wi-Fi connection at home.
3. A Valid Government ID
You cannot use your school ID or your gym membership card. You must use an official ID issued by the Philippine government.
Here is a simple list of the best IDs you can use:
- Driver’s License
- Philippine Passport
- National ID (PhilSys)
- SSS or GSIS ID
- UMID Card
- Voter’s ID
- Senior Citizen ID
- Police Clearance
Make sure your ID is not expired! If your ID is out of date, the computer system will reject your application instantly.
Unlocking Great Promos Like an20 tm After Setup
Once you finally finish the paperwork, the real fun begins. Registering your number does not just keep you safe; it actually unlocks the best parts of the network! TM is incredibly famous for offering some of the cheapest and most amazing text and data deals in the entire country.
You can immediately start subscribing to budget-friendly offers as soon as you fully activate your card. For example, many loyal users quickly register for promos like an20 tm to get awesome texting benefits. This specific classic promo gives you unlimited texts to all networks and free calls to TM and Globe users for an entire day, all for a super tiny price!
Once the system officially lists your number, you will also receive special text alerts about secret discounts and free data rewards. The network loves to reward users who obey the rules properly. So, look at this process as your secret key to unlocking a world of totally cheap and amazing mobile deals!
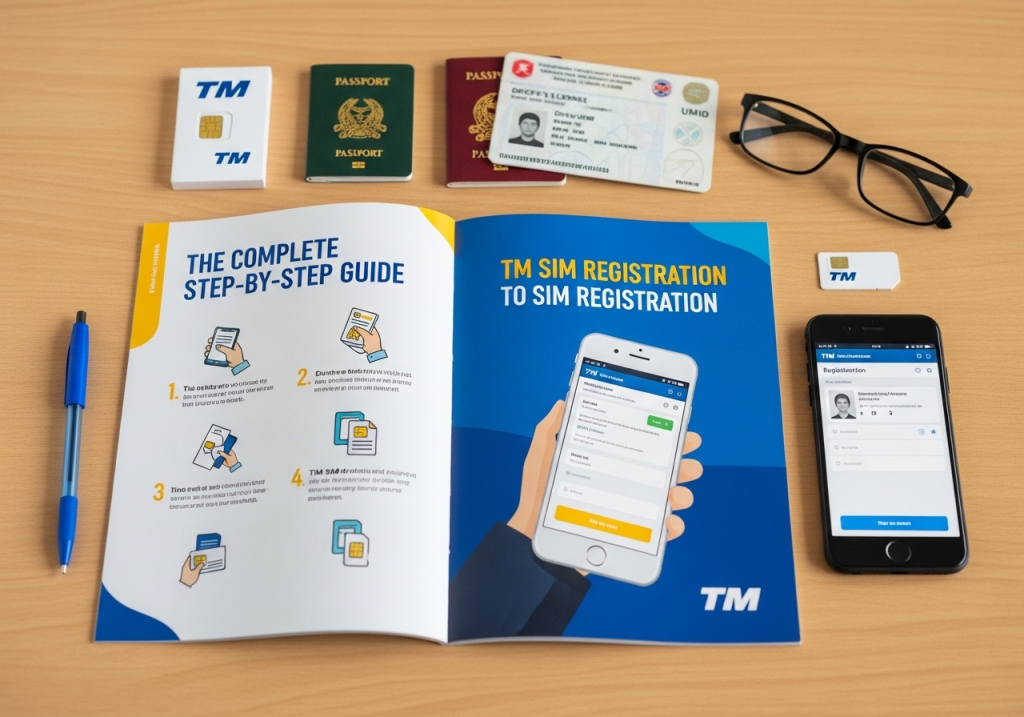
Step-by-Step Guide: How to Register Your TM SIM Online
Now you are fully prepared. It is time to clear your name and activate your phone. Do not feel intimidated at all. The website is actually very friendly, highly colorful, and incredibly easy to read.
Just follow these simple steps carefully:
Step 1: Go to the Official TM Website
Open your favorite web browser like Google Chrome or Apple Safari on your phone. Type in the official web address for TM SIM registration (which is handled by their parent company, Globe). Make sure you are on the real website and not a fake scam link. Look for the little padlock symbol near the top of your screen!
Step 2: Enter Your Mobile Number
You will see a big empty box on the screen. Type your brand-new 10-digit TM mobile number here. Do not type the zero at the very beginning (for example, type 915 instead of 0915). Click the “Register” button.
Step 3: Wait for the Secret OTP Code
Keep your phone screen awake! The website will instantly send a 6-digit One Time PIN (OTP) to your phone through a text message. Type those six numbers into the computer screen within five minutes. This proves that you actually hold the phone in your hand.
Step 4: Fill Out Your Personal Details
A new electronic form will pop up on your screen. You need to type in your simple details. They will ask for your full legal name, your birthday, your gender, and your complete home address. Be very honest! Your spelling must exactly match the spelling on your physical ID card.
Step 5: Upload Your ID and Selfie
The website will ask you to attach your legal documents. You need to take a clear picture of the front of your ID card. Next, you need to take a clear “selfie” picture of your own face. The computer will compare your selfie to the picture on your ID to make sure you are the same person.
Step 6: Check the Privacy Boxes
Scroll down to the bottom of the page. You will see a few little boxes asking if you agree to the privacy rules. Read them quickly and check the mandatory boxes.
Step 7: Submit and Save Your Reference Number
Double-check everything to make sure you spelled your name perfectly. When you are ready, hit the big “Submit” button!
The screen will load for a few seconds, and then it will show a massive “Success” message. It will give you a special Reference Number. Take a screenshot of this number immediately! This is your solid proof that you finished the job completely.
How to Take the Perfect ID Photo and Selfie
The number one reason people fail their registration is because their pictures are totally terrible. The computer system is very smart, but it cannot read blurry text. If your photo is dark and messy, you will have to start all over again.
Here are the absolute best tips to get your photos approved instantly:
Tips for Your ID Picture:
- Find good lighting: Place your ID flat on a table near a bright window. Natural sunlight is the absolute best light.
- Avoid terrible glare: If your ID is made of shiny plastic, the camera flash will create a giant white spot on it. Turn off your camera flash completely.
- Do not cut the edges: Make sure all four corners of the ID card are visible inside the picture frame. Do not zoom in too close!
Tips for Your Selfie Picture:
- Take off your accessories: Remove your sunglasses, your face mask, and your heavy hats. The computer needs to see your beautiful eyes and your whole face.
- Look straight ahead: Do not do a silly pose or tilt your head. Look directly into the camera lens just like a passport photo.
- Find a plain background: Stand in front of a plain white or light-colored wall. A messy bedroom in the background can confuse the computer system.
Special Rules for Minors and Foreigners
The rules are slightly different if you are very young or if you are visiting the Philippines for a short holiday. You still need to register, but you need different paperwork.
If You Are a Minor (Under 18 Years Old)
Children and teenagers cannot legally register a SIM card under their own name. If you are a minor, your parent or your legal guardian must register the card for you.
You will use their name, their home address, and their official government ID on the website. You will also need a simple letter of consent from them saying it is okay for you to use the number.
If You Are a Foreign Tourist or Expat
Welcome to the Philippines! If you bought a TM card to use during your vacation, you can absolutely register it.
Instead of a local ID, you must upload a clear picture of your international Passport. You also need to upload a picture of your flight ticket showing when you plan to leave the country, or a picture of your hotel booking. Your SIM card will only be active for exactly 30 days. If you are working or studying here long-term, you will upload your Alien Certificate of Registration (ACR) instead.
Common Mistakes You Must Avoid
Technology is amazing, but it can be very strict sometimes. To make sure your online process goes perfectly smooth, you should avoid these common beginner mistakes.
1. Uploading Files That Are Too Big
The website has a strict file size limit. Your pictures must be smaller than 5MB (Megabytes). If you take a picture with a super fancy new smartphone, the file might be too heavy! If the website rejects your photo, try taking a screenshot of the photo in your gallery. Screenshots are usually much smaller files and will upload perfectly.
2. Refreshing the Page Too Fast
When you click the final “Submit” button, the screen might load slowly. Do not panic and do not hit the refresh button! If you refresh, the system will break, and you will have to type all your details again. Just be incredibly patient and wait for the green success screen.
3. Ignoring Fake Scam Websites
This is a massive warning! You must only use the official Globe/TM portal. Never click a random link sent to you in an email or a weird Facebook comment. Scammers build fake websites that look exactly like the real one to steal your ID picture. Always check the web address bar at the very top of your screen.
What Happens If You Do Not Register?
Some people think they can just ignore the system entirely. They think the computer will eventually forget about them if they wait long enough. This is a very huge mistake! The computer never forgets.
If you refuse to register your TM SIM card, terrible things will happen to your mobile connection:
1. Total Deactivation
The government set a very strict deadline. If you do not register, your SIM card will be completely permanently deactivated. It will become a useless piece of plastic.
2. You Lose Your Old Number
Have you used the same phone number for ten years? Do all your bosses and family members know that specific number? If it gets deactivated, you lose that number forever. You cannot get it back. You will have to buy a brand new one and text everyone your new details.
3. You Lose Your Digital Money
Many people use their mobile numbers for GCash or Maya digital wallets. If your SIM dies, you will lose access to your digital money! You will not be able to receive the secret OTP codes to log into your bank accounts. Do not let a small lazy mistake turn into a massive financial nightmare!
How to Know If Your Registration Was Successful
Okay, you followed all the steps perfectly. You hit submit. Now you are just waiting. How do you know for sure that your phone is actually working now?
It is very easy to check your exact status.
First, as soon as you finish the website form, you will see the “Success” page. It will give you a long Reference Number.
Second, within a few minutes, you will receive a congratulatory text message directly from TM. The message will clearly say that your number is officially registered under the law.
Finally, try making a simple phone call or sending a text message to your best friend. If the text goes through instantly, you are totally good to go! You can now load your phone with regular credits and start using your favorite apps completely stress-free.
Frequently Asked Questions (FAQs)
You might still have a few lingering questions bouncing around in your head today. I have gathered the most common questions Filipino mobile users ask about this process online. Let us clear up any remaining confusion right now!
Do I have to pay money to register my TM SIM?
No, absolutely not! The registration process is 100% completely free. If a website or a person asks you to pay a fee to register your number, it is a dangerous scam. Run away immediately!
Can I use the Globe One App to register my TM number?
Yes, you absolutely can! TM is owned by Globe. If you download the free Globe One App from the Google Play Store or Apple App Store, you can easily register your TM number directly inside the app. Many people find the app even easier to use than the website!
What should I do if the website says “System Error”?
Sometimes the main server gets too crowded because thousands of people are trying to register at the exact same time. If you see an error page, simply close your browser, wait a few hours, and try again later tonight.
Can I register three different SIM cards under my own name?
Yes, you can! There is currently no strict legal limit on how many SIM cards you can own. However, you must repeat the entire registration process and upload your ID separately for every single new number you buy.
Is it totally safe to upload my ID to the website?
Yes, it is extremely safe. The telecom companies use top-level bank encryption to protect your digital data. Just make sure you are definitely on the official website and not a weird scam link you found on social media.
What if I accidentally misspelt my name on the form?
If you typed the wrong letter and already hit submit, do not panic. You cannot fix it online yourself. You must physically visit a Globe/TM store branch. Bring your mobile phone and your original ID card, and a friendly staff member will correct the spelling mistake in their system for you.
Conclusion
Getting a brand-new phone number is definitely fun, and setting it up does not have to be a nightmare anymore. You now know absolutely everything about the digital TM registration process!
You know how to find the official portal, what specific ID cards you need to prepare, and exactly how to take the perfect selfie. Most importantly, you know how to avoid common mistakes and protect your private data from sneaky online scammers.
Remember, having a mobile phone is a huge privilege and a great tool. We all have to follow the new rules to keep our community totally safe from bad guys. The best thing you can do is accept the new law, settle your registration quickly, and enjoy your amazing mobile connection.
Always respect the rules, stay safe online, and have a fantastic time using your new TM number today! Your stress-free digital connection is just a few simple clicks away.